Displays the Work Parameters dialog. Up to 9 hardness profiles within the same chart are possible.
Resets all the performed measurements for the current profile and resets
the Test Number counter.
![]() To display a standard graticule
on the live image, see the Graticules section in WDM
Video Control.
To display a standard graticule
on the live image, see the Graticules section in WDM
Video Control.
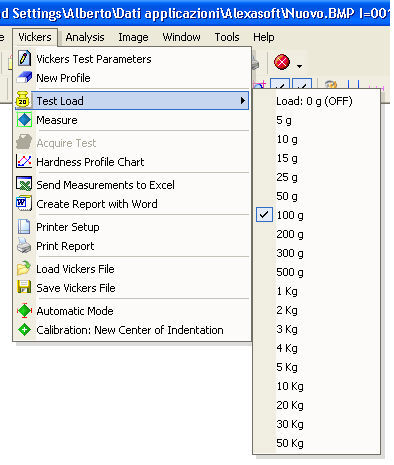 test load
 Allows you to select the test load. By selecting the 0 g load the Vickers mode is disabled;
Enables
or disables the measuring mode. The initial one is the Manual mode.
The Automatic mode is enabled by selecting the function from the Vickers
menu: Automatic Mode.
Manual Mode
In Manual mode if an image is displayed in the work environment and
if the test load is different from zero the Vickers measuring graticule
will be displayed.
![]() The measurement can be performed both on the acquired
image and the live image with compatible WDM
acquisition peripherals.
The measurement can be performed both on the acquired
image and the live image with compatible WDM
acquisition peripherals.
The measuring graticule consists of two pairs of cross hairs with full
screen size. The left mouse button allows you the alternate selection
of the pairs. Once the four lines are made to coincide with the four vertices
of the impression, by clicking the right mouse button the measuring graticule
will be locked. Once the graticule is locked a further collimation is
possible by using the arrow keys. If
the <Shift> key is kept pressed the arrow keys allow you to move
the other pair of cross hairs.
The upper left window displays in real time the horizontal and vertical
measurements, the Vickers hardness, the test load and the Rockwell equivalent.
The line colors, fonts and window background color can be selected
from the Tools menu.
Automatic Mode
To perform the first measurement you need to have already indicated
the New Center of Indentation with the Calibration:
New Center of Indentation function.
The program automatically searches for the the position of the four
vertices of the impression, displays the measurement values and the processing window.
The current measurement value of the current profile is sent to the table in Work Parameters. The measurement is also sent to the Excel spreadsheet if you have selected Send Measurements to Excel.
Displays the chart
with the active profiles selected in Work
Parameters.
Opens automatically an Excel spreadsheet with predefined formatting.
The current measurement is sent to the spreadsheet by pressing Acquire Test![]()
Sends automatically to the selected document template all the measurements and the information defined in Work Parameters together with the loaded image if available.
Sends to the printer all the information entered in Work Parameters, with predefined formatting and without using Word.
Reloads all measurements and data in Work Parameters previously saved.
Saves all measurements and data present
in Work Parameters.
This switch
enables/disables the automatic mode. Before performing the measurement
![]() it is necessary
to indicate the position of the impression with Calibration: New Center of Indentation. If the program always works in automatic
mode this switch can remain selected all the time.
it is necessary
to indicate the position of the impression with Calibration: New Center of Indentation. If the program always works in automatic
mode this switch can remain selected all the time.
To perform a new measurement press ![]() or
press the Apply button in the
processing
window.
or
press the Apply button in the
processing
window.
This function has been added to enable
the program to perform the automatic measurement even when there are several
impressions in the same image.
To define the new coordinates of the center of indentation select the function
and indicate with the right mouse button the approximate position of the
center of indentation. If the indentation always falls in the same point
of the image there is no need to redefine the New Center of Indentation
at each measurement. The program saves the coordinates of the Center of
Indentation for the following tests.